Compression & expanding tutorial
Compressors and other dynamic effects are arguably some of the hardest processes to understand. If you are confused by the subject, then this tutorial should help you. We attempt to demystify the process and explain why these tools are an essential part of today's music production techniques.
Introduction
As you record, adding more instrumentation and building your song, some parts will naturally become louder than others. A classic example of this is a song that contains both verse and chorus. Although it's usual that the chorus will be louder than the verse, the aim should be to reduce the difference in levels between them as much as possible, but why? Imagine you are on the subway, listening to the chorus of a song on your MP3 player. When the chorus ends and the verse starts, are you still able to hear it clearly with all the background noise around you?
You can apply a similar concept to the individual waves when you load the recording into an audio editor and zoom into the waveforms, this can reveal quite startling results.

Dynamic processors are basically automatic gain manipulators. As a result they can diminish level differences (compressors), enlarge them (expanders), or change them in various ways. Below, we discuss the parameters in detail, using the extremely versatile MDynamics advanced mastering dynamics processor plugin, to demonstrate.
Threshold & ratio

Firstly, look at the image above. Dynamic processors generally show a curve like this, which outlines what they actually do.
Threshold defines the position of the central point, at which the processing starts. Ratio shows how 'steep' the slope will be after the central point.
It is actually fairly straightforward: on the image the threshold is -12dB and the ratio is 4:1, the horizontal axis displays input level, while the vertical axis shows output level. Therefore, when the input level is below the threshold, say -30dB, you can see from the graph that the output level is -30dB as well, so basically no compression is applied. However, when you follow the input level on the graph towards 0dB, the compressor starts to work and lowers the output level to -9dB. This is called a -9dB gain reduction.
Here's the basic formula: Our threshold is placed at -12dB, so everything below that isn't affected. Our ratio is 4:1, so for every 4dB on the input above the threshold, the output increases by just 1dB. If the input level is 0dB, it is 12dB above the threshold, the output should be just 3dB above the threshold (12 divided by the ratio, which is 4), which is -9dB.
What is it used for? If we go back to our song, let's say the level of the verse is -12dB and the level of the chorus is 0dB. See what the compression does? It doesn't affect the verse, but lowers the level of the chorus to -9dB, so the difference between verse and chorus was 12dB and now it's only 3dB! So the compressor 'compresses' dynamic differences above the threshold. The mechanics of this are much more complex, but this gives us the basic idea.
Now, if we simply change the ratio from 4:1 to 1:1.5, we have created an expander! Every 1dB above the threshold will increase the output level by 1.5dB.
If we set a ratio of 1:4 (which is very, very steep by the way), it would basically invert the change done by the compressor in our first example above. The level of the verse is still -12dB, so again it would not change. However, the level of the chorus is now -9dB, that's 3dB above threshold, so the output should be 12dB (3 * the ratio of 4) above threshold, which is 0dB! The same level as it was before using the compressor. So the expander 'expands' dynamic differences above threshold. Again, the reality is much more complex.
Signal level - attack time & release time
Detecting the signal level Imagine a one bar break in the middle of a very loud chorus. How does your dynamics processor know that this is still the loud chorus if you are not playing anything at that time? This sounds like an extreme case, but this actually happens every millisecond in your audio.
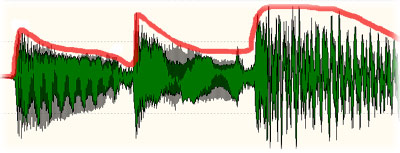
The peak meter in your DAW constantly moves up and down when a signal is present. The real signal level, as the computer sees it, is moving much, much, faster. If you look at the waveform on the audio signal graph below, this shows exactly what a 'peak detector' would use as the audio level. Imagine something like that going through the compressor as it has been described above? It would become a wave shaper and cause severe audio distortion.
The red level line is what we would expect the signal level to be:
The traditional way to achieve this is by the use of envelope followers. This diagram shows what a basic envelope looks like when processing a rectangular pulse waveform (blue line):
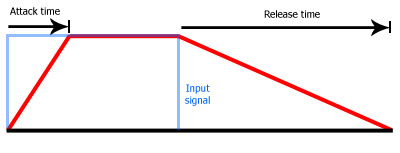
Attack time defines how quickly the level can rise and release time defines how quickly it can fall. Obviously for real signals the envelope would be much more complex, but the idea is the same. Once the threshold is crossed the level curve can rise only as quickly as is allowed by the attack time, and can fall only as quickly as is allowed by the release time. The lower the time, the faster the change.
Good compressors will show the movement of the detected level (in the case of the MDynamics plugin, this is displayed as a vertical line - "Current input level" in the image above). Therefore you only need to know how it sounds when changing the attack or release time. See below for some examples.
The envelope generally follows the audio signal, always staying slightly behind it. It is important that it is smooth as this makes the resulting sound more natural. Setting both attack and release time to 0ms would give you the wave shaper (and the distortion) again!
Additional parameters
Side-chain
The idea of a side-chain is to process the incoming audio signal but using another audio signal for level detection. The effect is commonly used by radio presenters that need the level of the background music to 'duck' whenever they speak, so that listeners can hear them over the music. The compressor is placed onto the music track, and the voice is sent into its side-chain input. This allows the compressor to process the music track, while detecting the level of the voice. When the presenter is not speaking, the detected signal level cannot reach the threshold, so the music is not compressed at all. But when the presenters voice is detected, the detected level rises above the threshold and so it turns down (compresses) the music.
Another idea is using a filter - let's have a drumset audio where the snare drum is just too loud and you want bring it down. It has already been mixed, so it is impossible to get the snare drum track separately. However you can use a compressor and tune it to react to a snare drum only. Most snare drums have some specific dominant frequency in say the 500Hz-1kHz range. If you use a band-pass filter in the detector, you can make the compressor process the whole signal, but react only to this part of the spectrum. So it will only follow the snare drum (and other instruments that play in the same frequency range), compressing the audio signal when levels above the threshold are detected.
It's possible to get much more creative effects with side-chain compressors. For instance, you can make the whole mix pump around the bass drum, gate one signal following another one etc.
Look-ahead
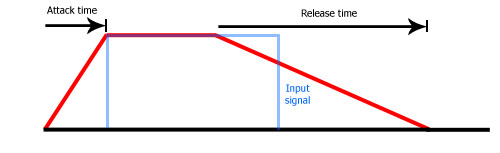
In the rectangular pulse diagram above, the envelope follows the signal, so even though the signal starts with a high value, it still takes some time for the envelope to get to that level. Look-ahead is a feature of some of the more advanced processors. This allows the processor to detect the envelope before it actually happens. It is in fact a type of side-chain, where the signal is split into two. One stream is delayed and the other is used for the level detection. This is the result:
Note that look-ahead induces latency. It is often used by limiters to minimize distortions (a limiter is basically a compressor with some special settings).
Peak/RMS
When the audio level is detected from the pure waveform as in the examples above, the processor is called a peak compressor. But there is another, slightly more complicated version, called an RMS compressor. In this case the envelope is not generated from the waveform level directly, but by a pre-processed averaged level. The basic idea is that the level at any given point in the waveform is determined by looking at a number of previous samples, and averaging them. The RMS level is of course much smoother than the waveform itself. After processing through the envelope detector the level becomes even more so, allowing RMS compressors to usually provide more natural results. However, for transient based sounds such as drums, you may want to stick with peak compressors. MDynamics provides full RMS length control, so you can check what it does in practice.
Knee
Knee makes the curve smoother around the threshold point. Rather than changing from no compression (below the threshold) to full compression at the selected ratio (above the threshold) the ratio is introduced gradually, from a level slightly below the threshold. Like this:
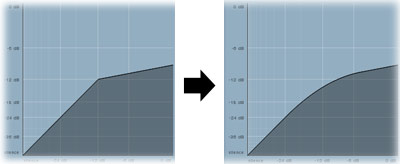
The 'soft' knee can make the gain reduction sound smoother because it allows the ratio to increase gradually until it reaches the threshold where the full ratio is then applied. However, because the compressor performs more compression in the area of the knee than it would normally do, it will not be the right choice for all signal types. Make careful comparisons and trust your ears. The simple rule here is if it sounds good, it is good.
Practical usage
Now we've covered all the main parameters, let's go through some examples.
Scenario 1 - Compressing a song

Macro-dynamics is the term used for minimizing the level differences between multiple parts in a song. Setting up the compressor for this task consists of 2 parts:
1. Level detection in the "Dynamic detection" panel. As we are compressing long blocks of audio, we need the detected level to change very slowly. To achieve this, we need to set long attack and release times. Start at around 500ms attack time and 2000ms release time, this is a rough estimate at this stage and both values may end up being much higher. To smooth things out even more, we should also use RMS level detection. Set the RMS length to at least 1ms.
2. Threshold and ratio. Play a section of the verse until you get an idea of the general level by watching the vertical line moving in the graph. If for example, the level was around -20dB, we could set the threshold to -20dB. Now play the chorus and watch the level again. If the input level is 0dB and you want to ensure the difference between verse and chorus will be 5dB maximum, you just need to set the ratio to 4:1.
In practice, you should do this by ear and not by numbers. Set the ratio to some value, play the chorus and verse and listen to the difference. The compressor basically leaves the verse at the original level and just attenuates the chorus.
Another method is to set the threshold to a very low value, for example -60dB, and use a small ratio. This way the whole song is compressed, and the louder the audio gets, the more compression takes place.
You should try both approaches; in some plug-ins, including ours) you can save both sets of settings and switch between them making comparison easy.
Scenario 2 - Compressing a snare drum
If we record a drummer playing a snare drum, we would typically face the following
issues.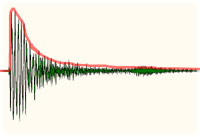 Firstly,
he doesn't play like a computer, so the volume or amplitude of each hit is different.
Secondly, microphones tend to exaggerate differences between these harder and
softer hits. And finally, the snare drum sound has a huge punch at the beginning,
but then it tails off very quickly.
Firstly,
he doesn't play like a computer, so the volume or amplitude of each hit is different.
Secondly, microphones tend to exaggerate differences between these harder and
softer hits. And finally, the snare drum sound has a huge punch at the beginning,
but then it tails off very quickly.
So we would want to level out the loudness, reduce the differences between the hard and soft hits, and achieve a typical snare drum sound with a nice long sustain.
Although it isn't immediately apparent, all these 3 goals are actually quite similar. We could tackle this with multiple compressors in series, however, for this tutorial, we'll just use one. In practice it is better to even out the loudness first using a specialized tool such as MDrumLeveler and then use the compressor just to control the envelope of each hit.
If you look at the waveform of the snare hit, you may notice that it looks like the envelope examples we discussed earlier. It looks a little like a steep hill, as it has an extremely quick attack and a fairly long release. The waveform of the softer snare hit, would look very similar, however the waves would be smaller in amplitude, so it would resemble a smaller hill, with a more gentle decline.

To tackle the problem, let's use a very small attack time, say 5ms, and a fairly small release time of 50ms. RMS length should be very small, or even zero (in which case, MDynamics operates as a peak compressor). If we loop the snare hit and just let it play, we can now watch the level meter. If the level gets to -10dB at the beginning, you may wish to start with a threshold of around -20dB and with a pretty big ratio, say 8:1.
You should already be able to hear a big difference. The drum sound will be longer and the volume lower (if too low, use output gain to bring it up a little). Let's change some parameters to hear what effect they have on the sound.
Attack time tweaking
With a 5ms attack time, you can probably hear the punch at the beginning rather well. This punch is also known as a 'transient'. After 5ms the level almost reaches its maximum value and so the compressor starts working fully and reduces the level. So you basically hear only the beginning of the punch as the rest of the sound is reduced, which is ideally how it should be.
If we increase the attack time to 50ms, the compressor is doing very little, because the short beginning doesn't even let the level envelope go over the threshold. Now decrease the attack to 0ms and hear the difference. The snare has now lost most of its punch and you can clearly hear the sustain.
Conclusion? Attack time mostly affects the beginning of the drum sound, and therefore its 'punch'. The lower the attack time is, the smaller amount of the punch is preserved.
Release time tweaking
A good snare drum sustains for several seconds, but we can safely assume that the level in the sustain is much lower than our threshold. During the attack stage the level rises to its maximum and the compressor reduces the level by, maybe, 5-10dB (note that this -10dB means that the punch becomes half as loud!). When the level drops, the compressor stops working, and the sustain is kept unaffected. So instead of making it louder, we make the punch quieter (and increase the output gain if necessary).
Now if we increase the release time to 2000ms, there is no longer any sustain present. This is because we don't allow the compressor to decrease the compression level quickly enough, so it acts as if the audio is still loud, and continues to reduce the gain, and also the sustain along with it. If we try using a very low value, 1ms for example, it will keep almost all of the sustain. However, this would include part of the punch as well and generally, release times that are too low, do not sound very natural and can also cause distortions.
Conclusion? Release time mostly affects the sustain. The higher it is, the more of the sustain is removed.
Advanced parameters & techniques
Dry/wet and parallel compression
Sometimes the compressor may produce a very good sound, perfectly preserved transients, sustain, caused distortion etc. But you may feel that the effect is just too much. If so, the simple solution, is to decrease the dry/wet parameter. This is a technique called parallel compression (also known as New York compression), which is actually nothing more than mixing the compressed signal with the original dry signal.
Let's take the snare example above. By compressing it, we may have highlighted the sustain, but destroyed most of the punch, so it isn't as clear in the mix any more. By mixing it with some of the original 'dry' signal, which mainly contains the punch, you will have both, the compressed signal containing the sustain, and the original signal containing the punch, producing a better sounding hit. Look for the Dry/Wet mix control in the compressor.
Range and limited compression
Let's say that we have processed a song using the macro-dynamics techniques. Choruses now sound good and are well balanced with the verses, but there is a great guitar solo, which is even louder than the chorus. That's a problem because, if the level is higher, it may get over-compressed. For example, if our current compression settings, are reducing say 10dB from each chorus, this same setting could remove 20dB from the guitar solo. In this case you can use a 'range' parameter, which makes the processing graph look like this:

It limits the gain reduction. Here the range is 10dB, which means that if the level is at or below the threshold (-20dB), it is not affected at all. When the level is in the range -20dB to -10dB it is compressed as defined by the ratio. When it is higher than -10dB, then the gain reduction is the same as it would be for -10dB. Hence if the chorus is -10dB (threshold + range), then nothing will be compressed more than the chorus.
Automatic release modes
So far we have covered manual release time. However, some compressors also have automatic modes which vary the release time. They are not an all-in-one solution, by any means. However, there may be times that using an automatic mode may yield good results. It may be that the audio signal isn't uniform, or the sustain on a drum track is different enough every time that you may want to try an automatic solution.
In MDynamics, there are several modes to choose from. Firstly, there are the 'automatic' modes, which tend to increase the release time (hence keeping a higher compression) the longer the signal stays above the threshold. The idea is that if the level is above the threshold for some time, it will probably stay there for quite a while. The 'Linear' modes increase the release time with the level. So the higher the level is, the longer it tries to stay there and therefore it keeps a higher gain reduction. Finally 'opto' mode simulates opto compressors which do exactly the opposite - the higher the level is, the lower the release time gets, therefore it tries to go down and lower the gain reduction.
There are no hard and fast rules about what method to choose. If you want use automatic release modes, you can experiment with them all to find the best results.
Temporary gain
What if we want to experiment with the amount of compression on the track, but at the same time are happy with its overall level? To illustrate, let's set the input gain to +10dB and output gain to -10dB. As long as the incoming signal is below the threshold, both gains would cancel each other out and nothing would happen at all. If we use for example a piano track, where the level is relatively stable, and set the threshold to that level, and the ratio to 5:1, the compressor will reduce the output gain only occasionally when the level exceeds the threshold.
Now, we want to find out how it would sound, with more compression, so we could decrease the threshold, but the resulting gain reduction would make the piano sound much lower, which would affect the mix. Similarly we could increase input gain, but that would only make it louder, giving us the same problem. We need to compensate for the change in gain by using an output gain parameter.
MDynamics can achieve this automatically. If we increase the 'temporary gain', it virtually adjusts the input gain to that value and compensates for it with an appropriate value for the output gain. As a result, using temporary gain allows you to control the amount of compression without causing big changes to the output level.
Custom processing graphs
MDynamics allows you to draw any shape you want to in the processing graph. This is a great way to experiment with settings to see how they affect the output sound. Simply click on the envelope points button at the top of the Processing Shape window and draw anything you want. Have fun!
